How to weave
Weaving is an art form that has been around for centuries. From creating simple textiles to complex tapestries that adorn the walls of palaces and museums, weaving has evolved over thousands of years and with recent renewed interest in hand crafts it continues to be a popular hobby for many people today.

Weaving Looms
There are several types of weaving looms, including frame looms, rigid heddle looms, and floor looms. Frame looms are simple and easy to use, and are ideal for small projects. Rigid heddle looms are versatile and portable, and can be used to create a variety of weaving techniques. Floor looms are larger and more complex, and are best suited for advanced weavers who want to create larger and more complex projects.
Frame Looms
The most basic weaving loom is a frame loom, usually made from timber with notches at either end used to hold your warp threads in place. They come in a variety of sizes, the smaller ones are often referred to as lap looms, the bigger ones often come with stands to help support the loom while you weave. They are a great choice for small projects or for experimenting with new weaving techniques. If you're interested in weaving but don't want to invest in a pre-made loom, you can make your own using simple materials like cardboard or PVC pipes.

Rigid Heddle Loom
A rigid heddle loom is a type of weaving loom that uses a heddle to lift and lower the warp threads. This type of loom is easy to use and is ideal for small projects like scarves and table runners.
Floor Loom
A floor loom is a large and complex weaving loom that is capable of creating intricate patterns and designs. It is typically used by experienced weavers and is ideal for creating large pieces like rugs and blankets.
Weaving Supplies
Before you start weaving, you need to gather all the necessary weaving supplies. These include a weaving loom, warp thread, weft thread, weaving needle, weaving shuttle, and a weaving comb. You may also need a shed stick and a tapestry needle depending on the type of weaving you plan to do.

Warp Threads
Warp threads are the vertical threads that are strung onto the loom before you can begin to weave. The number of warp threads used and their spacing determines the density of the weave and the overall texture of your finished piece. Warp threads can be made from a variety of materials including cotton, wool, silk, and synthetic fibers, typically warp threads are stronger and more tightly spun than the weft threads (see below). I usually use warp cord or cotton when I weave, it is widely available and can now be found in a pretty decent range of colours.
Weft Threads
Weft threads are the horizontal threads that run across your warp threads. (I always remember this by saying weft threads run left) These threads are where you can have some fun, they are used to create the design and texture of your weaving project. Weft threads are traditionally thinner and more pliable than the warp threads, as they need to be flexible enough to be woven over and under the warp threads. That said, a lot of modern weavers like to break with tradition and use a wide variety of yarns, fibres and materials to create interest and achieve a more contemporary woven piece, examples include roving, denim and even leather.

Weaving Needle
A weaving needle, also known as a tapestry needle or a darning needle, is a long, thin needle used to help thread the weft yarn through the warp threads. Weaving needles come in a variety of shapes and sizes, it is best to choose one that can easily carry your chosen yarn through your warp threads. A tapestry needle is also a great tool for finishing your weaving project. It can be used to weave in loose ends and to add extra texture to your design.
Weaving Shuttle
A weaving shuttle is a tool used to hold your weft thread as you weave. It's a great tool for creating even tension and for speeding up your weaving process.
Weaving Comb
A weaving comb, also called a beater, is a tool used to pack the weft threads tightly together after they have been woven through the warp threads. The comb is typically made of wood or metal and has a handle on one end and a series of teeth on the other. If you don’t have one you may be able to get away with using a kitchen fork or a wide toothed hair comb.
Shed Stick
A shed stick is a flat, thin tool used in the process of weaving to create the shed, or the opening between the warp threads through which the weft threads are passed. It is typically made of wood or plastic and is inserted between the warp threads to create the shed. The shed stick is removed and re-inserted as needed to create different shed sizes and weave patterns. You could also use a ruler if you have one long enough to pass through the width of your warped loom.

Getting Started
Warping the Loom
The first step in setting up your loom is to attach the warp threads. This process is called warping the loom, and it involves securing the warp threads to the top and bottom of the loom.
Begin by tying one end of the warp thread to the top left corner of the loom, then secure it to the bottom of the loom and bring it back up to the top. Repeat this process until you have added all the warp threads. Some looms have notches, others have pegs or nails and some require you to wrap your warp around the top and bottom bars. I prefer notches as they ensure even distribution of your warp yarn across the frame.
Tensioning the Warp
Tension is important in weaving to ensure that the fabric is even and the threads do not slip. It is difficult to explain how tight your tension needs to be and this does vary depending on your project. I like my warp to be tight enough that when I “strum” my yarns they return to place and do not stick to each other but loose enough that I can easily place a shed stick between my warps and pass my weft yarns through.
Weaving Techniques
There are a variety of weaving techniques you can use to create different patterns and textures in your weaving project. Some of the most popular weaving techniques include plain weave, twill weave, basket weave, soumak & rya knots.
Plain Weave
Plain weave, also known as tabby weave, is the most basic of all weaving techniques. It is created by passing the weft thread over and under each warp thread in an alternating pattern.
Twill Weave
Twill weave produces a diagonal pattern and is commonly used to make denim, herringbone, and tweed fabrics. It is created by passing the weft thread over two or more warp threads and then under one or more warp threads in a repeating pattern.

Basket Weave
Basket weave is created by weaving two or more weft threads over and under two or more warp threads. This pattern creates a checkered or square pattern.
Soumak
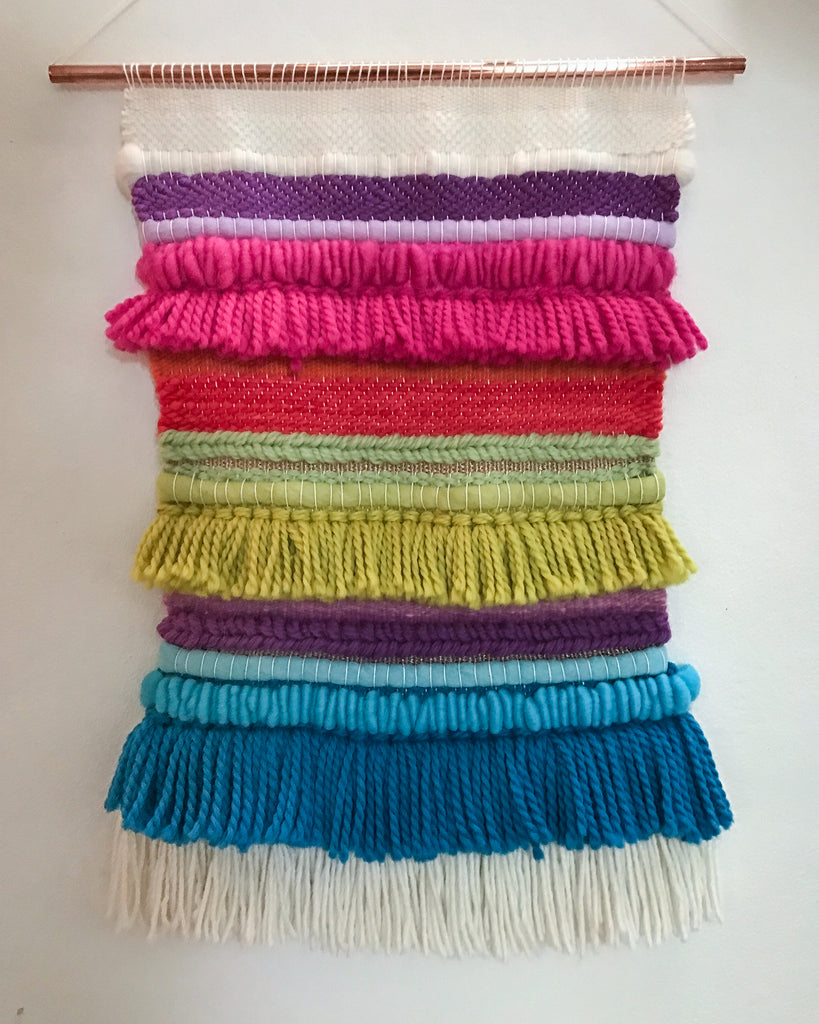
Soumak weaving is done by wrapping the weft thread around the warp threads in a figure-eight pattern, creating a looping effect that creates a raised, textured surface on the textile. When you weave a few rows of soumak your weave can appear to have a braided or plaited pattern on the surface.

Rya Knots
Rya knots are a type of knot used to add texture to weaving. To create a rya knot, cut several lengths of yarn and fold them in half. Thread the folded end through two warp threads, then loop the loose ends around the folded end and pull them through the loop.
Creating Patterns
To create patterns in your weaving, you can use different colours of yarn or different weaving techniques. For example, you can create stripes by using different colours of yarn for the weft thread.

Starting to Weave
Now that you know the different types of weaving looms and weaving techniques, it is time to start weaving.
To begin weaving, you'll need to thread your weaving needle with your weft thread and start weaving over and under your warp threads. This process will create the first row of your weaving project.
You can also pass the weft threads through the warp threads using the weaving shuttle. You can begin weaving from the top left corner of the loom, and work your way down to the bottom right corner. You can also work your way from the bottom to the top, or from the left to the right, depending on your preference. I like to start from the top of my weave to ensure I have neat loops to hang my piece from, you may want to begin by inserting a piece of dowel at the top before you complete your first row, this way you ensure you have allowed enough space.
Creating a bubble
When you’re weaving, it's important to maintain an even tension on the weft yarns as they are woven across the warp yarns. Pulling your weft yarns too tight, will cause your project to warp or distort. To avoid this, you need to create what's called a "bubble." This is done by inserting the weft yarn at an angle, and then gently pulling the other side of the yarn down towards the previous row. This creates a small loop, or "bubble," in the weft yarn. The weaver can then use a beater or comb to push the weft yarns down to meet the previous row. Start beating your yarns down at the centre and then at even intervals across your warp yarns. By creating a bubble, you can ensure that the tension remains even and the textile stays flat and even.
Continue Weaving
Continue weaving, passing the weft thread through the shed and using the weaving comb to push the weft thread down tightly against the previous row of weaving. As you weave, you may want to change the colour, the type of yarn or weaving technique you are using to create different patterns or textures in your weaving.
Finish Your Weaving
When you have reached the end of your weaving project, you will need to finish it off. This involves tying off the last weft thread and removing the weaving from the loom. If you haven’t already woven your loose threads back into your weave you will need to do this before trimming any loose threads.

Weaving Projects
Now that you know all the basics about weaving you need to start your first project.There are many different types of weaving projects that you can create, from simple wall hangings to complex tapestries. You can use your imagination and creativity to create unique and beautiful textiles that reflect your personal style and taste. For your first project you may wish to try using a weaving kit for beginners or a loom weaving kit, which will usually include everything you need to get started, including a loom, a shuttle, a beater, and some yarn. You'll also want to choose a simple pattern to start with, so you can learn the basic techniques of weaving on a loom. With practice, you'll be able to experiment with more complex patterns and techniques, and create beautiful woven pieces that you'll be proud to show off and say this was “MADE BY ME”.

My top 5 tips for beginners who want to try weaving:
- Start with a simple project: It can be tempting to jump right in and tackle a complex weaving project, but starting with a simple project can help you learn the basics of weaving and build your skills gradually. A simple project can be something as basic as a plain weave scarf or a small wall hanging.
- Choose the right tools: It's important to choose the right weaving tools for your project. A small frame loom or a basic rigid heddle loom can be a good starting point for beginners, as they are relatively affordable and easy to use.
- Learn the basics of weaving: Understanding the basic weaving techniques, such as the warp and weft, the shed, and the beat, is essential for any weaver. There are many resources available, including books, online tutorials, and classes, that can help you learn the basics of weaving.
- Experiment with different fibres and colours: Part of the fun of weaving is experimenting with different fibres and colours to create unique and beautiful textiles. As a beginner, you may want to start with more affordable fibres, such as cotton or acrylic, before moving on to more expensive materials like silk or wool.
- Practice regularly: Like any skill, weaving takes practice to master. Make time to practice regularly, even if it's just a few minutes each day. As you build your skills and confidence, you can take on more complex projects and experiment with different techniques and materials.